Saturday, July 14, 2012

Bacon, Egg, & Cheese Breakfast Biscuits


I decided to try out this Bacon, Egg, & Cheese Biscuit Muffin recipe I found on Pinterest a while back. I've been meaning to try it out for a while, but seldom feel like making something this fantastical until I've had at LEAST a gallon of really strong freaking tea or coffee.. Today was a bit different, though.. I'm running on pure adrenaline and hot anger! I woke up to the sound of creaking wood and a huge crash.. when I went outside to see what was up, this is what I found:


Did I mention my husband went out of the country for work this morning and won't be back for two weeks? Yeah. Murphy's Law. Gets me EVERY time my husband is gone. Even though we only bought the house two months ago and everything is still under warranty, apparently the fence is not, since we share it with our neighbors... But.. instead of heading outside like Rosie the Riveter, I decided to bake! Factor in hungry kids and the fact that it was only 7am, probably not a good idea to break out the Red Velvet Cheesecake Brownies recipe I've been eyeing.. I went through my boards and thought these biscuit muffins sounded fantastic and kid-friendly so I decided to try it out. It was actually pretty easy and came out decent!


This is what I used (the actual recipe, found here has exact measurements.. you may want to follow them instead -lol!):

1 package biscuit dough
eggs
cheddar cheese
bacon (I was too lazy to make bacon today.. it was in the freezer and required thawing.. too much work for 7am.. hence, the crumbled bacon pieces instead)
Black Forest ham

Ok. I'm going to tell you what I did, then tell you what I did wrong.. because I definitely screwed this one up (blaming it on the broken fence and lack of caffeine)!

1. Preheat oven to 400*, grease muffin tin, and beat eggs (I used 1 whole egg and 3 egg whites - Firstborn won't eat egg yolks, #2 doesn't like egg whites.. I compromise this way..)


2. I then flattened out my biscuits and put them in the muffin pan, making sure they stayed above the rim of the pan. I added some cheddar cheese (definitely too much..), spooned in some of the egg mixture, and topped half with bacon and half with ham (again.. picky mini me's... one hates ham, one hates bacon..) Not sure if this is how it's supposed to look, but this is what mine looked like!


I put them in the oven and set the time for 12 minutes... Opened the oven to check them (because my stupid oven, which I hate, has a VERY small window on the front and it's SUPER hard to see inside..) and was greeted with a wall of stinky black smoke.. When the author of the recipe wrote it, she wasn't kidding when she said not to over-fill these bad boys... the eggs spewed over the side when the biscuits started to rise, leaving me with the mess of burnt eggs in the bottom of my oven. DO NOT OVERFILL!!  Trust me.. It's not pretty, and it's not fun.. Anyway... 12 minutes was not enough.. I think I had to go closer to 20, but I don't trust my bitch of an oven, so who knows if she's the one that screwed it up! From now on, I'm going to refer to my oven as "Karen"... If you're a Dane Cook fan, you'll totally understand why... If you're not, you need to YouTube that shit and find out what I'm talking about! OK - back to the food.. This is what I was staring at when I finally cleared out the kitchen and pulled these out of the oven:


Once I got them out of the pan (which, thankfully, was not too hard, thanks to over-doing it with the cooking spray beforehand!), they didn't look too bad:


And in case you're wondering what they look like inside:


Ok.. so here is what I did wrong:

1. I used Grands large flaky biscuits - there were only 8, not 10 in the package, making the biscuits larger and therefore rise much more than normal biscuits. So... either get regular packaged biscuits, or make your own!

2. DON'T OVERFILL THE STUPID THINGS!! Yeah.. Go easy on the eggs and cheese inside.. burning eggs to not make your house smell great or appetizing..

3. Cook longer than 12 minutes, unless you like your eggs a bit less "set"...

That's all for today! Time to figure out what to do about the damn fence... Hoping to make homemade Cheez-its this week, too - keep your eyes out!


Sunday, July 8, 2012

Crock Pot Shredded Chicken/Chicken Enchiladas/Chicken Tortilla Soup

I love Mexican food... anything that tastes remotely Mexican.. from roach coaches in front of Home Depot, hole-in-the-wall places that probably violate 10+ health codes, Taco Bell, etc... Luckily, I live in California, so I can pretty much walk 10 feet in any direction and find a place that sells it.. Unfortunately, Mr. Picky Pants husband and the offspring don't appreciate a good chimichanga and their stomachs can't handle the bowels-of-hell spice that most of these places provide. So, when I have a hankerin' for some tasty Mexican food, sometimes I look no further than my own home.

We eat plain ol' tacos at least once a week, but one recipe that the hubs asks for once in a while is my chicken enchiladas. It's actually a three to four meal deal, first I make shredded chicken, then I can either make chicken enchiladas out of it, Mexican chicken sandwiches, or chicken tortilla soup - If I'm lucky and make enough, I can make all four! I've passed this recipe out quite a bit and have gotten pretty good reviews, so I'm going to share it with you here:

Shredded Crock Pot Chicken
4-6 chicken breasts (or equivalent dark meat)
1 can corn (drained)
1 can black beans (can be seasoned or not - do not drain)
1 can diced tomatoes (you can use plain or the kind with chilies)
1 small can diced green chilies or jalapenos
1-2 cans chicken broth (enough to COMPLETELY cover chicken)
1 small diced onion
1-2tbsp minced garlic (or 3-4 freshly chopped cloves)
fresh cilantro (amount is up to you!)
lime juice (amount is up to you!)
1tbsp ground cumin (to taste)
1tbsp chili powder (to taste)
optional: dash of hot sauce of your choice (to taste - i use tapatio..)

*Note - you may want to put the chicken in last so you can taste the broth before-hand.. a lot of my cooking is a dash of this or that and i change it up every time i make it - make sure you like the flavor before you add the chicken the first time... probably not a good idea to taste it with raw chicken hanging out in there!

1.Combine all ingredients in Crock Pot
*I was out of black beans today, so I just used a can of pinto beans - an acceptable substitute! Also, all I had were monster-sized frozen chicken breasts and I only used three... Here is what it looks like with everyone in the pool:


2.Set on "high" and leave for at least 6 hours

3. Once chicken is fall-off-the-fork tender, pull it out and shred it with two forks and place it back in the broth (unless you're making enchiladas..)


Chicken Enchiladas
2 cans cream of chicken soup
about 1c milk
sour cream
1-2 cans diced green chilies or chopped jalapenos
hot sauce of your choice
monterey jack cheese and/or cheddar
sharp cheddar cheese
flour tortillas (or corn... I don't like corn for this recipe, though, because it tastes weird with the white sauce..lol)

1. In a sauce pan heat the cream of chicken soup with milk to thin it.

2. Add green chilies/jalapenos and a dash of hot sauce (add to your desired taste - if you like it spicy, go crazy! If not, leave it out!)

3. Once chilies have been incorporated and simmered a while, add in a few good sized dollops of sour cream (I never measure..lol.. just enough to thin it and make it a bit whiter..)


4. Ladle enough sauce into the bottom of a 9x13 pan to cover it.


5. Using the Crock Pot Shredded Chicken or your desired recipe, spoon chicken into a flour tortilla and sprinkle with cheddar cheese. Fold ends in and roll burrito style then place in the 9x13 pan. Repeat until the pan is full (usually 8-10 enchiladas depending on how you stuff them!)


6. Ladle sauce over the enchiladas and cover with  cheese. This is what it should look like with a "normal" amount of cheese:


This is what it looks like with the amount of cheese my family likes (close to 2 bags total - inside the enchiladas and on top):


7. Bake at 350* until sauce is bubbling and cheese is melted and slightly brown (mine don't really brown anymore, due to the amount of cheese.. if I let them brown, they end up really dry and nasty!):


Chicken Tortilla Soup

There really isn't a recipe for this.. lol.. Just use the Crock Pot Shredded Chicken recipe, leave it as is and serve in a bowl! Garnish with shredded cheese and crushed tortilla chips, corn tortillas, or tortilla chip strips (found near the croutons at your local grocery store)


Tuesday, July 3, 2012

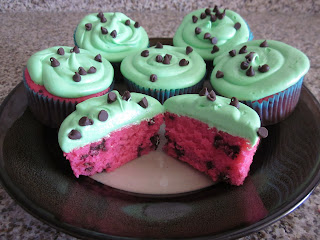
"Watermelon" Cupcakes


So every year, I go to my best friends' house to celebrate the 4th of July (and pretty much every other holiday where family get-togethers are the norm). Her entire family is there - both her side and her significant others' side of the family and they have all welcomed us as part of their extended family. Perfect, considering my whole family lives in central Michigan and my husbands' family is in central Ohio. A few years back, I made the mistake of bringing a simple, festive little strawberry lemonade poke cake and since then, I am the resident baker for EVERY get-together we have... Not such a bad thing, except when you are pretty competitive - even with yourself and feel the need to "1-up" yourself every damn time you have to do something.. so.. it's getting increasingly more difficult to come up with new ideas. Enter Pinterest. I found this gem a few weeks back and thought it might be a good change-up from my usual red, white, and blue sprinkled fancy cookies or flag replica sheet cake. The only problem with this pin? No recipe. If you click on it, it takes you nowhere.. it is just a picture. So, I decided to just make it on my own - I mean, it looks pretty straight-forward.

I love to bake, but have yet to find a white cake recipe that doesn't taste like flour and isn't dry as hell. I took to allrecipes.com and found one that had pretty good ratings/reviews, so here it is, with a few minor adjustments. If you want to see the original recipe, click here.


Gathered up all of my ingredients and got to work. *Note* this recipe would probably be a serious bitch if you don't have some kind of mixer.. As I said, I made a few adjustments, so here is the recipe as I prepared it:

1 1/4c white sugar
1/2c (1 stick) butter
2 eggs
1tbsp vanilla extract
1tbsp almond extract
1 1/2c flour
1 3/4tsp baking powder
1 1/4c whole milk
1 tsp food coloring (I use Wilton gel food coloring and I used the color, Rose - you can use more or less, depending on the color you're going for)
1 bag mini chocolate chips

1. Preheat oven to 350*

2. In your mixer, cream the butter and sugar together until it is super fluffy - seriously - like 5 minutes.

3. While the butter and sugar are going, SIFT together your flour and baking powder in a separate bowl.

4. Add in one egg at a time to your butter/sugar mixture and beat well between each egg (2-3 minutes each).

5. Add vanilla and almond extract to butter mixture. By now it should look kind of fluffy and everything should be fully incorporated like this:


6. Add the flour mixture to the butter mixture and incorporate completely - don't add the flour mixture all at once.. add about 1/3 at a time. It should look like this:


Not much different, but it will be a bit drier than the butter mixture alone.

7. At this point, I added in my food coloring, but didn't mix it in. I put in 3/4c of milk and mixed it altogether, then added the last 1/2c of milk and mixed. You should probably scrape the bowl once or twice during this, otherwise there will be uncolored cake batter at the bottom of the bowl, which will result in some funky-lookin cakes. Once the milk and coloring was completely incorporated (no weird pink streaks or white chunks anywhere..), I threw in some mini chocolate chips (no measuring.. I probably used about 1/3 of the bag), and stirred, rather than beat them in. Ta-da! Finished batter!


8. Spoon the batter into the pan (with cupcake wrappers..) and filled them about half-way.


And baked them for 22 minutes. Since the whole bowl made 24 cupcakes, I had some time to kill.. while I was baking the first batch, I attempted cleaning up my kitchen... but that proved futile, since my dishwasher was full and I HAAAAATE hand-washing dishes... While the second batch was baking, I decided to play with the dog.. Which was pretty much me yelling baby-talk at her, squeaking her toy like crazy, and throwing said toy.. Only to have to retrieve the toy and start all over.. This is the face she gave me the entire time:


Then I thought she was going to play because she took the toy away from me and decided to take a nap instead..


Leave me the F alone, she says. Or at least that's what I got out of the face she was giving me..

Anyhoo... back to the cupcakes.. When they were completely baked, they looked like this:


I understand there are only 20 cupcakes.. and that I made 24... two were sacrificed to my kids, who may or may not have chewed my kneecaps off if i didn't share.. the other two are a complete mystery... said every fat kid that has ever sneaked food.

For the frosting, I was lazy... I usually make a pretty killer buttercream, but I did not have the ambition to make it today, and good thing, too... I was out of powdered sugar anyway... Plus, I always have a jubilee of canned frosting on hand.. sort of addicted to graham crackers/animal crackers dipped in the stuff.. If you DO want to make your own frosting, this one is perfect for cupcakes and for piping borders on cakes.. If you want a more authentic buttercream flavor, sub half the shortening with softened, unsalted butter - straight butter usually melts into a big disaster and doesn't make amazing icing.. the shortening holds up better than butter.


I didn't get a chance to take a pictures of the frosting process, but basically, I just put the canned frosting into my mixer with Wilton Leaf Green gel food coloring and beat until it was colored throughout...

You can really frost these any way you want - knife or piping bag and tip, but I went with the piping bag to try and make it as close to the Pinterest picture as possible. I used a disposable piping bag and Wilton piping tip #24 and iced from the outside of the cupcake, in. After that, just added a few mini chocolate chips!

Ok. Now that I've tasted them, here are some things I would probably change next time:

1. It's not bad, but I think next time I'll use milk chocolate chips instead of semi-sweet (all I could find that day..) because the semi-sweet are sort of over-powering against the cake.

2. The cake itself has a great consistency, but it's not too sweet. I think my overly sweet canned frosting kind of makes up for that, though...

3. Will make sure to fill the cupcake wrappers a bit more - this recipe rises, but not as much as I'm used to cake rising.. Maybe I will try adding 2tsp of baking powder next time, too..

4. Canned frosting was a bad idea, as far as appearance goes.. It doesn't hold it's shape, so combined with the shallow cupcakes, their overall appearance was a little short...

If you have a recipe you'd like me to try, email/comment and I'll add it to the list.. Later this week, I'm going to get those chicken enchiladas put up here and probably my super-easy fail-proof salsa recipe. I don't really have a witty way to end this entry, so I'm just going to stop writing..


Sunday, July 1, 2012

Meatloaf.

Either you love it or you hate it. I spent years despising this beefy goodness as a child, only to find I just didn't like the way it was being made. First off, I HAAAAATE ketchup - hate me if you will, but it's gross. So slathering it on greasy, baked hamburger meat with soggy bread crumbs and some eggs was definitely NOT my forte...

Once I married Mr. Picky Pants, I found out that he loves meatloaf almost as much as a fat kid loves cake. So I had to play around with it and find a way to make it that both of us could tolerate... It ended up being a pretty standard meatloaf, only I added some A-1 steaksauce to the mix and only ruined one half of the meatloaf with ketchup before throwing it in the oven.

This post isn't about baked meatloaf, though... It's about GRILLED meatloaf... Seriously. I made meatloaf the other night and since it was hotter than the 10th level of Hell in my house, there was no way I was firing up the oven! I'm going to apologize for the lack of pictures - my camera battery decided to die before I even though of doing the meatloaf.

That being said, this is what I did:

1. I made the meatloaf mixture - Use whatever one you normally use, or if you really want me to post one, let me know - mine is probably much different than what you're used to, though! I add WAY more garlic than most sane people can tolerate!

2. Form it into a loaf slightly thinner than you would usually make and don't put it in a pan. I just set mine on a piece of foil.

3. Preheat your grill.. I started it around medium-high (gas grill... I have not yet mastered the of charcoal grilling, though that is on my list of "shit I need to learn this summer."). Once the grill was ready, I put on the meatloaf on the grill and let it sear for 5 minutes. Flipped it and did the same.

4. Once it has seared, turn the heat down to medium or medium-low and let it cook to your desired doneness... I'm pretty partial to super-well done meatloaf, but to each their own! (If you like ketchup on it, put it on during the last 5-10 minutes and let it bake in.

That's pretty much it - You have not lived until you're had grilled meatloaf! Awesome way to make a comfort classic into a summer meal!